Showing posts with label domestic goddess-to-be. Show all posts

Thursday, February 11, 2010

Almost Meeting Time!

Tidy every room in the house? Check.

Make cranberry bliss bars? Check.

Force NavyGuy to vacuum? Check.

Make mini cookies? Check.

Make chocolate covered strawberries? Check.

Hide all remaining junk in closets and under the bed? Check.

Display fancy flower arrangement to impress fellow Navy wives with my style, grace, and flower-arranging abilities at our meeting tonight?


BlaZOW. Check.

Read more...

Saturday, December 19, 2009

Holiday Baking

She's finally been takin' out for her first spin...


Yes, it's official. After being terrified to turn it on for six months, I used the glorious pink KitchenAid stand mixer for the first time today to make several different kinds of holiday cookies. It's kind of intimidating, no? Okay, maybe I'm the only one, but it's like super expensive and heavy as all get out, so I was always a wee bit nervous that I was going to break it or something. So I just let it sit on my counter and shine in all it's pretty pinkness.

Well her cushy days of just being counter candy are over! Baby works like a charm! In fact I spent so much time baking this morning, that Tally finally got bored of wandering around my feet and decided to curl up in a safe place (just in case things went haywire in the kitchen).

The results of all my hard work today? A couple batches of Fudge Crinkles, a family recipe called Sweet Treats, and possibly my new favorite: Fake-Out Starbucks Cranberry Bliss Bars...

I'll admit, they aren't quite the same as the real ones (the blondie base is thicker than the ones you'll get at Starbucks), but the flavor and taste is super similar, and I think, quite delicious. My mom found the recipe here, and even though they take some time and effort, they're way worth it. (Mine obviously don't look as pretty as those in the recipe photo, but give me a break - this was the first corner piece that's always a pain in the booty to get out of the pan!).

More recipes to come - I have Monday off of work, so I'm going to try to get some fudge made, and NavyGuy will absolutely die if he doesn't have his Peanut Butter Chocolate Wheat Thins.

What Christmas cookies are your favorites? Does anyone have all their baking done?

Read more...

Saturday, October 17, 2009

DIY Jewelry Display

NavyGuy got me a great jewelry box for Christmas a few years back, but as with everything, my current collection of baubles has outgrown its former home. I can't bear to part with the jewelry box, so I decided to simply supplement the storage.

Photobucket

Pictured above are (almost all) of the materials used in this project. You need: scissors; double-sided Tacky Tape (Walmart); a 12" by 12" piece of scrapbook paper with a cool design; a 12" by 12" cork board (I got mine from Target, with four in a pack for about 5 dollars... they're in the school supplies section); and decorative brads (you can get these at any craft store - they're pictured in better detail below).


Photobucket

First up is to line the entire perimeter of your corkboard with Tacky Tape. Tacky Tape is double-sided, so you'll pull it off the roll, cut the length you need, and then stick it to the corkboard. The second sticky side is hidden by a red vellum layer, which you'll peel off once you're ready to attach your scrapbook paper.

DIY Jewelry Display

See? There I am pulling off the red layer. What you can't see well in the photo, is the sticky strip of tape left behind on the corkboard - trust me, it's there. (Also, gotta love the gratuitous wedding ring shot :)

DIY Jewelry Display

Once you have the red layer removed from all around the cork, you can center your piece of paper above it, and stick the two together. I actually found it easier to turn the paper upside down, then lower the corkboard on to the paper.

DIY Jewelry Display

My paper was slightly bigger than 12x12, so I had a little edge left over once I attached the two. Very simple to fix - just cut the excess paper off the edge.

DIY jewelry

Now, these are the brads I picked out. Brads have two little metal flaps sticking out the back of them; you attach a brad by sticking the flaps through a piece of paper (or whatever material you're working with), and then flattening those two metal flaps outward to hold the brad in place. I chose to use them for the hangers on my jewelry display.

DIY jewelry

Before poking any holes in my cork, I laid out all of the brads to make sure I liked the spacing and general arrangement. I wanted to make sure that the brads were high enough up on the board, leaving room for longer necklaces to hang down.

DIY jewelry

Once I had everything spaced out, I marked each brad with a light pencil mark, and then started pushing them all through, and bending the metal flaps outward. The one catch is not to push the brads right up to the corkboard, because you want to leave a slight gap between the brad and the board where the necklace or bracelet can hang from.

DIY jewelry

And here's the finished project! I'm thrilled with how it turned out - my extra necklaces and bracelets have a place to rest (instead of in a jumble on my dresser), and it'll look cute on the wall.

Read more...

Saturday, September 19, 2009

Tasty Treat

Pink baking goodness.

Making muffins

One pink bowl, two pink bowls, three pink bowls! (And a pink spatula for good measure.)

This bread mix was a wedding shower gift; I opted to make muffins as an attempt at better portion control.

Raspberry Almond Crisp Muffins

Yum!

Muffins

Muffins, good. Pink muffins, goooooood.

Read more...

Monday, August 31, 2009

Home Sweet Home: Hanging Curtains

Window coverings for the basement family room was one of the major projects I knew we needed to accomplish while Mom was visiting. The family room is right on the ground level of the main road past our house, so all night long we could see headlights going by and people could see into our lounging area. The entire upstairs of the house has nice wooden slat blinds, but we don't have the funds to outfit all the basement windows with such luxuries right now, so inexpensive drapes needed to work. Per usual, IKEA came through for us.

IKEA Curtains - Lenda 2 pair with tie backs

The size we needed (55x98) was on sale for only $14.99! WHOA! Way cheaper than anything I had seen online at other stores, so we picked up three sets. That way, we'd have six panels to cover the span of the two large windows and sliding door.

Photobucket

A separate trip to Lowe's where we found two curtain rods and the necessary hardware, and we were in business! NavyGuy got to work installing the rod while Mom and I took turns ironing the large blue panels. Above, you can see NavyGuy gingerly working around the television; Mom refused to get anywhere near the TV lest she damage it in some way and forever be the mother-in-law who broke her son-in-law's baby television set.

Hanging curtains

Can you see what's on the television while we worked? Inspiration of course! Basically HGTV is the only channel that all three of us could agree on, so we soaked up many episodes of House Hunters, Color Splash, and Bang for Your Buck while we worked.

Curtains

Voila! Window coverings! They look slightly ghetto in this photo for some reason, but take my word for it - they look much better in real life (and anything is better than two blankets push-pinned into the wall...). I'm pretty excited about the blue color as an accent for the basement. I'd say for about $75 dollars and some time on a step ladder, we got a good end result.

Read more...

Wednesday, July 1, 2009

Crazy for Chicken Salad

I'm nuts for chicken salad. There are a thousand different varieties with countless combinations of fruits, veggies, nuts, and flavors. I'm a fan of any version, but this was the first time I attempted to create my own. NavyGuy (who claims he hates chicken salad) gobbled his up. I used my "Busy Family Cookbook" as inspiration and altered two different recipes to come up with tonight's dinner.


Chicken Salad Croissants
- 2 cups cooked shredded chicken
- 1 cup halved seedless red grapes
- 1/2 cup sliced celery
- 1/4 cup sliced green onions
- 3/4 cup mayo
- 1 teaspoon lemon juice
- 1/4 teaspoon salt
- croissants
- lettuce leaf (optional)

In a large bowl, combine the chicken, grapes, celery, and onions. In a separate smaller bowl, mix the mayo, lemon juice, and salt. Drizzle the mayo mixture over the chicken, etc.; stir well. Pile on a cut croissant and devour.

Just fabulous! Of course, adding a croissant pretty much makes everything wonderful, but this would even be good without it. I'm excited to try another version in the future - I've seen recipes that include green apples, pecans, and all kinds of other tasty things. What do you go crazy for in your chicken salad?

Read more...

Tuesday, March 17, 2009

Happy St. Patrick's Day

I may not ride the corned beef and cabbage train, but I do rock a great Irish Soda Bread recipe :)

This is my second annual loaf after Historygirlie convinced me I could probably tackle this one without much disaster inspired me with her version a few years back. NavyGuy tasted this year's version and declared it a winner!

Amazingly Easy Irish Soda Bread

- 4 cups all-purpose flour
- 4 tablespoons white sugar
- 1 teaspoon baking soda
- 1 tablespoon baking powder
- 1/2 teaspoon salt
- 1/2 cup margarine (or butter), softened
- 1 cup buttermilk
- 1 egg

- 1/4 cup butter, melted
- 1/4 cup buttermilk

1. Preheat oven to 375 degrees F (190 degrees C). Lightly grease a large baking sheet.


2. In a large bowl, mix together flour, sugar, baking soda, baking powder, salt and margarine. Stir in 1 cup of buttermilk and egg.

3. Turn dough out onto a lightly floured surface and knead slightly. Form dough into a round and place on prepared baking sheet.

4. In a small bowl, combine melted butter with 1/4 cup buttermilk; brush loaf with this mixture. Use a sharp knife to cut an 'X' into the top of the loaf.


5. Bake in preheated oven for 45 to 50 minutes, or until a toothpick inserted into the center of the loaf comes out clean, about 30 to 50 minutes. You may continue to brush the loaf with the butter mixture while it bakes.


Mine cooked up in 35 minutes, but it's definitely something you need to check every 5 minutes once you're past the 30 minute mark. I brushed it with the buttermilk/butter mixture twice while it cooked, and it keeps the bread much moister. This is a very dense bread, and can get dry if you overcook it; if you're worried about that, set the oven temp a little lower and cook for a bit longer.

Read more...
Monday, March 9, 2009

I {heart} Target

I always associate the smell of lemon with dusting. Having used Pledge for years on end, I can no longer smell a nice lemon pastry without thinking of dusting the piano. However, these little buggers might allow me to overcome my Pavlovian cleaning response to the smell of lemon.The Swiffer dusters are wonderful. They're on sale this week for $3.50 and you get five dusters in a pack. I'm able to dust the whole house with one duster, so in my mind that means it only costs me .70 cents per dusting! I will admit they are not as perfect as in the commercials, but dang close. If you need some inspiration to swipe off the flat surfaces in your home, I'd definitely spring for these - they almost make dusting enjoyable!

Read more...

Sunday, March 8, 2009

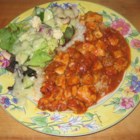
Recipe: Tomato Curry Chicken

We have a couple new recipes on the menu for this week (yes, I've started planning weekly menus... I've become boring and old and practical and too lazy to go to the grocery store eight three times a week). First up tonight was a variation on curry chicken. NavyGuy would eat aluminum foil if it was seasoned with curry, so I was fairly confident that this recipe would be a winner.

Tomato Curry Chicken Ingredients:

  • 4 skinless, boneless chicken breast halves
  • 2 tablespoons butter
  • 1 onion, chopped (I used about 3/4 of a small onion)
  • 2/3 cup beer
  • 1 (10.75 ounce) can condensed tomato soup
  • 1 teaspoon curry powder
  • 1/2 teaspoon dried basil
  • 1/2 teaspoon ground black pepper
  • 1/4 cup grated Parmesan cheese
Directions:
  1. Preheat oven to 350 degrees F (175 degrees C).
  2. Place chicken in a 9x13 inch baking dish. Melt butter in a medium skillet over medium heat. Saute onion, then stir in beer, soup, curry powder, basil and pepper. Reduce heat to low and simmer for about 10 minutes, then pour over chicken.
  3. Bake at 350 degrees F (175 degrees C) for 1 hour; sprinkle with cheese for last 10 minutes of baking.
I followed the directions exactly as they're written, and it was delicious! I love that it takes a little bit of prep ahead of time, but then you just shove the dish in the oven and essentially leave it alone for an hour. I served it over white rice. You could also serve it with couscous, which would soak up the extra sauce quite nicely. Let me know if you try it and have success!

Just a quick Happy Sunday Night card! The image is from Stampin' Up Pocket Silhouettes.

Read more...

Monday, February 9, 2009

I {heart} Target

This week's featured Target item... adorable and festive tableware!
The pink owl paper plates would be fabulous to use for a Valentine's Day snack (of cupcakes or chocolates of course). Or, if you're cutting costs and skipping the fancy dinner with your sweetie, you could still splurge and decorate the dining room at home with the pretty table runner (and then eat your budget-friendly spaghetti off of the matching plates!).

Having an intimate knowledge of Target stores, I'd wager that you can find these fun items near the candy isles; they're probably close to the special V-Day candy hearts and baking goods. There's also cups, napkins, place card holders, and smaller 7 inch plates.

Read more...

Tuesday, February 3, 2009

Recipe: Wisconsin Chili

With the cold and ickiness last week, it was the perfect time for chili. NavyGuy and I prefer the Wisconsin version (with macaroni noodles!) and I've shared the recipe below...

Wisconsin Chili
- 1 T vegetable oil
- 1 to 1.5 pounds ground beef
- 1/2 C chopped onion
- 1 packet of chili mix seasoning
- 1/2 C water
- 1 can (14.5 oz) diced tomatoes undrained
- 1 T brown sugar
- 1 C uncooked elbow macaroni

Directions
1. Heat oil in skillet. Brown beef and onions.
2. Add chili seasoning mix, water, tomatoes, and brown sugar.
3. Bring to a boil. Reduce heat, cover, then simmer for anywhere from ten minutes to several hours (the longer it simmers the richer the flavor).
4. Just before you're planning to eat it, cook the elbow macaroni according to the package directions. Then add them to the chili mixture. (If you add the macaroni to the chili mixture earlier in the process, the noodles will soak up all of the water and end up overdone.)

Serve with oyster crackers, Saltines, or rye bread. Mmmmmm!

Read more...

Monday, February 2, 2009

Super Bowl Sunday

I've discovered what it takes to make football interesting for me.

Money.

NavyGuy and I went to a Super Bowl party tonight. Another flight student in his class was hosting a party at his house, and as we're always up for chicken wings a good time with friends, we headed over there to watch the game. Part of the fun of the night revolved around a pool that everyone threw money into. NavyGuy and I had awfully terrible numbers (the pool was based on numbers in the teams' scores at the end of each quarter), but as the fourth quarter neared an end, we were in position to win the big prize! Suddenly, I was inappropriately interested in whether or not the Steelers scored again... as opposed to previously when I was only interested in the commercials (which by the by, stunk hard core this year). Sadly, the stupid Steelers did manage to score again, snatching a twenty dollar prize away from me.

Still a good party though (despite NavyGuy's near coronary at the poor calls by the refs). I brought the infamous Beer Dip, a recipe that Historygirlie gave me a few years ago. It has become a staple of all festivities and gatherings ever since, and NavyGuy will dip almost anything into it (chips, pretzels, veggies, chicken wings, napkins, etc.). It's too tasty not to share the recipe:

HistoryGirl Beer Dip
Mix all of the following ingredients (I use a hand mixer to make sure it's super smooth): two regular size packages of cream cheese, one packet of ranch dressing mix, 1/2 a can of beer, and a little bit of shredded cheese. That's it! Refridgerate (it's excellent the second day because the beer has soaked in more), and eat with pretzels or crackers.

Read more...

Wednesday, January 14, 2009

Let Them Eat Cake!

Drooling yet?

And my sister wondered what in heavens name I would do with a cake dome... (thanks for the bridal shower gift!!)

NavyGuy ate 1/4 of it within twenty minutes of it being frosted. I think it's the pink frosting that won him over. (Yes, I made the cake. Yes, it was a Betty Crocker box mix. Yes, I've made my piece with it.)

Read more...
Blog Widget by LinkWithin

  © Blogger templates The Professional Template by Ourblogtemplates.com 2008

Back to TOP